Monday, June 9, 2014
Sunday, June 1, 2014
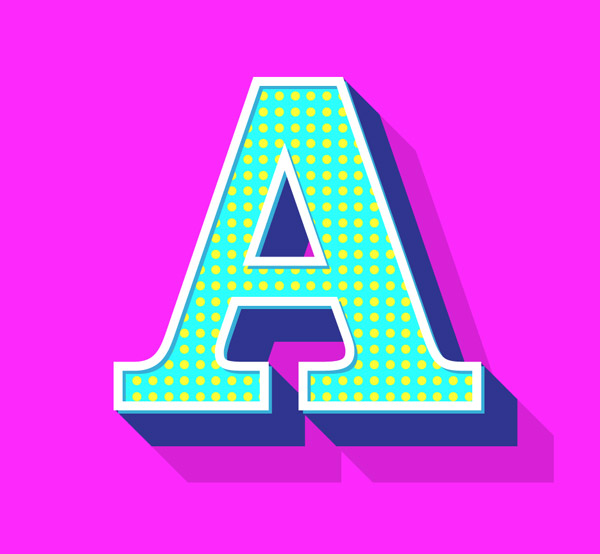
GIT 1 - Final Spread
Recreate the magazine layout from this picture. Call it "5 Things I Learned About Print"

On the right side there are 8 white boxes. Inside each box, define each of the following terms like you would see in a dictionary. You may need to look them up at dictionary.com or wikipedia.org.
On the right side there are 8 white boxes. Inside each box, define each of the following terms like you would see in a dictionary. You may need to look them up at dictionary.com or wikipedia.org.
- Bleed
- Margin
- Gutter
- Drop Cap
- CMYK
Tuesday, May 27, 2014
GDL 2 - Scratch Games
Complete the basic "Getting Started" tutorial for Scratch - http://scratch.mit.edu/projects/editor/?tip_bar=getStarted. Create an account to save your work.
Scratch is a free game engine made by MIT. It is designed as an introduction to coding. The thought process is the same, but it utilizes puzzle pieces that only fit in certain ways, so you can focus on the concepts instead of syntax.
Create your own games in groups of up to 4. Utilize the skills you have gained this semester to create game characters and backgrounds. Be sure to visit the "Explore" link at the top of the Scratch homepage. You may remix an existing game, but all visuals must be original work
Grading Objectives
- Characters created in Adobe Illustrator
- Background created in Adobe Illustrator
- Complete game
GDL 1 - Vintage Poster
DUE: Friday, May 30th
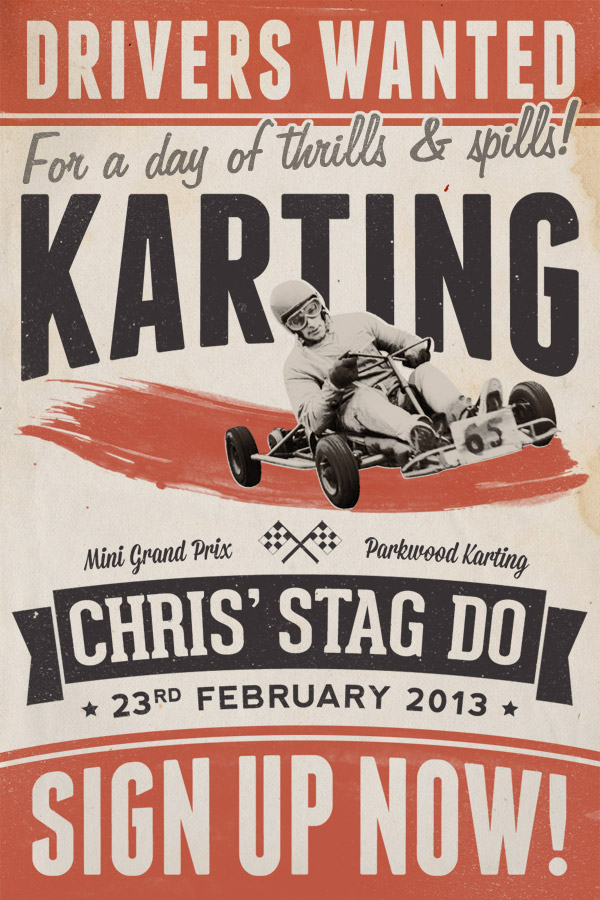
Create a vintage poster with your favorite event or party, like graduation. The tutorial uses a go kart, but you may choose any subject and pull an image from google. You may choose any paper texture, try lostandtaken.com. Follow the Chris Spooner tutorial here.
This tutorial will be a demonstration of the combined power of Photoshop and Illustrator.
File >> Save for Web... and upload your finished project to your blogger for grading.
GRADE ELEMENTS:
- Page layout built with Shapes and Pathfinder
- Text layout
- Proper page proportions (ie Portrait)
- Adding texture with Opacity Blend Modes
- Photo cutting and editing
GRADING:
Students will be graded on the quality of lines and the ability to utilize the tutorial tools.
LINKS:
http://blog.spoongraphics.co.uk/tutorials/how-to-create-a-retro-style-race-poster-in-photoshopMonday, May 19, 2014
GDL 2 - Portfolio Website
Use TextEdit to create a webpage to display your artwork. Use the following markup as your template. Change the variable 'page_url' to match your blogger address. Make sure you keep the quotation marks.
Setup your Google Drive to host your website: https://support.google.com/drive/answer/2881970?hl=en
Be sure to save your html files with as .html and stylesheets as .css
Create a logo, header and footer sections with a separate color, a background color, and a font from google web fonts.
REQUIRED ELEMENTS:
RESOURCES:
https://www.google.com/fonts
http://www.w3schools.com/html/default.asp
https://support.google.com/drive/answer/2881970?hl=en
<!DOCTYPE html>
<html>
<head>
<script src="https://code.jquery.com/jquery-1.10.2.min.js"></script>
<script>
$(document).ready(function() {
// CHANGE THIS TO YOUR SITE URL
var page_url = "http://learngdl.blogspot.com";
// START - DON'T CHANGE THIS CODE!!!
$('#gallery').load("http://crispycatfish.com/school/imageScrapper.php?_url=" + page_url );
}); //document.ready
// END - DON'T CHANGE THIS CODE!!!
</script>
</head>
<body>
<div id="gallery">
</div>
</body>
</html>
Setup your Google Drive to host your website: https://support.google.com/drive/answer/2881970?hl=en
Be sure to save your html files with as .html and stylesheets as .css
Create a logo, header and footer sections with a separate color, a background color, and a font from google web fonts.
REQUIRED ELEMENTS:
- Valid HTML - http://validator.w3.org/
- <DIV> tags for all of the following:
- Header
- Footer
- Content
- Navigation/Sidebar
- At least 3 images
- Use of at least 3 different HEX colors - http://colorschemedesigner.com/
- At least 3 of the following tags
- <p>
- <ul>
- <ol>
- <h1> ... <h6>
- <a>
- <br>
- <b>
- Valid CSS including at least 3 of the following:
- border
- background
- color
- width
- height
- float
- box-shadow
RESOURCES:
https://www.google.com/fonts
http://www.w3schools.com/html/default.asp
https://support.google.com/drive/answer/2881970?hl=en
<!DOCTYPE html>
<html>
<head>
<script src="https://code.jquery.com/jquery-1.10.2.min.js"></script>
<script>
$(document).ready(function() {
// CHANGE THIS TO YOUR SITE URL
var page_url = "http://learngdl.blogspot.com";
// START - DON'T CHANGE THIS CODE!!!
$('#gallery').load("http://crispycatfish.com/school/imageScrapper.php?_url=" + page_url );
}); //document.ready
// END - DON'T CHANGE THIS CODE!!!
</script>
</head>
<body>
<div id="gallery">
</div>
</body>
</html>
GDL 2 - HTML+ CSS Quiz
Complete this QUIZ
Answer all questions. If you don't know an answer, guess. Once you hit submit, your quiz is recorded. You will not have the opportunity to change answers.
https://docs.google.com/forms/d/1OyxlwGN7uaUvAnPLEhu_N1G1qEYE6WW9gpPY-ylFm54/viewform?usp=send_form
Answer all questions. If you don't know an answer, guess. Once you hit submit, your quiz is recorded. You will not have the opportunity to change answers.
https://docs.google.com/forms/d/1OyxlwGN7uaUvAnPLEhu_N1G1qEYE6WW9gpPY-ylFm54/viewform?usp=send_form
Thursday, May 15, 2014
Wednesday, May 7, 2014
GDL 2 - HTML

Web design is one of the larger segments of the graphic design field. It is a good idea for all designers to understand at least the basics of web design, since their work will most likely end up online. Additionally, most designers use online portfolios to show off their talents and self promote.
Pair up in groups of 2. No groups of 3. Only 1 computer should be on for each group to ensure the internet connections are fast enough. Let me know immediately if you are having an issue with your connection. This will not be an excuse for lack of project completion. No late work will be accepted.
Sign up for an account at codecademy.com. Work together to complete the HTML & CSS course. When you have completed it, show me the results page. On Monday, I will be grading you and your partner based on the completion of the course . If the results page shows that you have completed 68%, your grade will both receive 68% for the assignment. This assignment is worth 50 points. If you need to work on this outside of school, do it.
GRADING:
- 50 points
- Percentage of course completion = grade
LINKS:
codecademy.com
Tuesday, May 6, 2014
GDL 2 - Web Design Wireframing
Read through the linked material to learn about wireframing. The basic idea of wireframing is to create a website design plan focusing on the structure without being distracted by color.
Blogger has a basic setup that you will likely not want to change too much. However, you still have option for logo design and placement, how pictures will flow on the page, and where to put your navigation.
Create a 3 paper wireframes of your new site design. Circle your favorite and create it on Illustrator at 960px W * 768px H. Then choose at least 2 color schemes and create 3 color site mockups. Notate each artboard with your reason for choosing your colors. Finish your design with a new logo.
Your Illustrator file should include (on separate artboards)....
- 1 B&W wireframe mockup
- At least 2 color schemes
- 3 or more color site mockups
- Artboard notation
- New logo
LINKS:
GDL 1 - Fox Illustration
DUE: Thursday, May 8th
Use a variety of simple shapes combined with warping effects to create a cartoon fox. Be sure to complete the tutorial including strawberries, flowers and dotted background.
Grading Objectives
Use a variety of simple shapes combined with warping effects to create a cartoon fox. Be sure to complete the tutorial including strawberries, flowers and dotted background.
Grading Objectives
- Use of shapes
- Use of Warp Effects
- Completion of all tutorial elements
LINKS:
Monday, May 5, 2014
GIT 1 - Writing an Article
Look through the links to learn about how to write an article for a magazine. Here is a suggested outline from Scholastic...
The Basic Story OutlineThe best way to structure a newspaper article is to first write an outline.
Review your research and notes. Then jot down ideas for the following six sections. Remember, this is just a foundation upon which to build your story!
I. Lead sentenceGrab and hook your reader right away!
II. IntroductionWhich facts and figures will ground your story? You have to tell your readers where and when this story is happening.
III. Opening quotation What will give the reader a sense of the people involved and what they are thinking?
IV. Main bodyWhat is at the heart of your story?
V. Closing quotationFind something that sums the article up in a few words.
VI. Conclusion (optional—the closing quote may do the job)
What is a memorable way to end your story? The end quote is a good way to sum things up. That doesn’t always work. If you are quoting more than one person with different points of view in your story, you cannot end with a quote from just one of them. Giving one of your interviewees the last word can tilt the story in their favor.
LINKS:
http://www.scholastic.com/teachers/article/writing-your-article
http://www.dailywritingtips.com/writing-for-magazines/
http://www.thepenmagazine.net/20-steps-to-write-a-good-article/
http://business.tutsplus.com/articles/the-15-step-freelance-writers-guide-to-writing-for-magazines--fsw-28445
Tuesday, April 29, 2014

Monday, April 28, 2014
GIT 1 - Superman Spread
Create a spread for Superman based on this image:

You MUST include the following in your design:

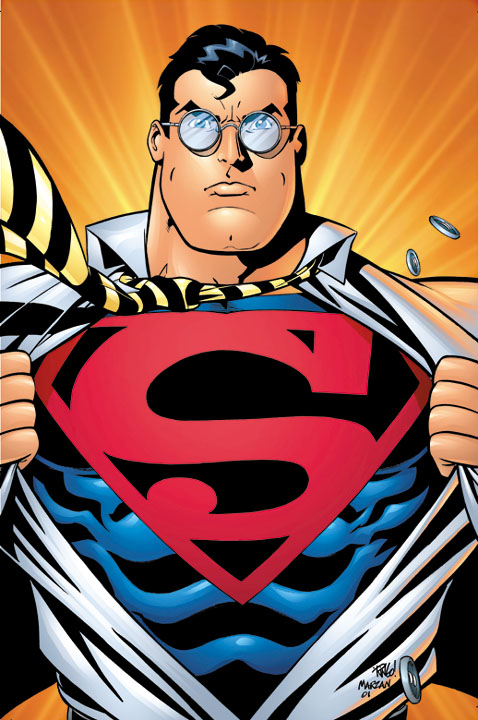
You MUST include the following in your design:
- Place a photo on the left of the caped crusader
- Create a title over the image
- Create several text wraps
- Copy DC's wiki for your body text
MY EXAMPLE:
RESOURCES:
GDL 2 - Pixel Animations

Create a full animation in Photoshop with characters created in Illustrator. You may reuse characters you have already made.
Your animation must include:
- 3 unique characters
- Detailed background
- At least 5 separate movements / tweens
GRADING OBJECTIVES
- NO Strokes
- NO Grid Lines
- Smooth motion / tweens
- GIF creation
LINKS:
Additional Resources -
GDL 1 - Pixel Art Characters
Create 3 pixel art characters using the linked tutorial. Be sure to use the grid as shown in the tutorial. You may recreate the same characters from the tutorial or use your own. Characters must be complex for full credit, PAC MAN IS NOT ALLOWED.

GRADING OBJECTIVES:
GRADING OBJECTIVES:
- Complex pixel art characters
- Use of grid
- NO stroke or grid lines
LINKS:
Friday, April 25, 2014
GIT 1 - Design Challenge - Red Riding Hood Spread
Create a spread for Red Riding Hood based on this image:

You MUST include the following in your design:

Little Red Cap promised to obey her mother. The grandmother lived out in the woods, a half hour from the village. When Little Red Cap entered the woods a wolf came up to her. She did not know what a wicked animal he was, and was not afraid of him.
"Good day to you, Little Red Cap."
"Thank you, wolf."
"Where are you going so early, Little Red Cap?"
"To grandmother's."
"And what are you carrying under your apron?"
"Grandmother is sick and weak, and I am taking her some cake and wine. We baked yesterday, and they should give her strength."
"Little Red Cap, just where does your grandmother live?"
"Her house is a good quarter hour from here in the woods, under the three large oak trees. There's a hedge of hazel bushes there. You must know the place," said Little Red Cap.
The wolf thought to himself, "Now there is a tasty bite for me. Just how are you going to catch her?" Then he said, "Listen, Little Red Cap, haven't you seen the beautiful flowers that are blossoming in the woods? Why don't you go and take a look? And I don't believe you can hear how beautifully the birds are singing. You are walking along as though you were on your way to school in the village. It is very beautiful in the woods."
Little Red Cap opened her eyes and saw the sunlight breaking through the trees and how the ground was covered with beautiful flowers. She thought, "If a take a bouquet to grandmother, she will be very pleased. Anyway, it is still early, and I'll be home on time." And she ran off into the woods looking for flowers. Each time she picked one she thought that she could see an even more beautiful one a little way off, and she ran after it, going further and further into the woods. But the wolf ran straight to the grandmother's house and knocked on the door.
"Who's there?"
"Little Red Cap. I'm bringing you some cake and wine. Open the door for me."
"Just press the latch," called out the grandmother. "I'm too weak to get up."
The wolf pressed the latch, and the door opened. He stepped inside, went straight to the grandmother's bed, and ate her up. Then he took her clothes, put them on, and put her cap on his head. He got into her bed and pulled the curtains shut.
Little Red Cap had run after flowers, and did not continue on her way to grandmother's until she had gathered all that she could carry. When she arrived, she found, to her surprise, that the door was open. She walked into the parlor, and everything looked so strange that she thought, "Oh, my God, why am I so afraid? I usually like it at grandmother's." Then she went to the bed and pulled back the curtains. Grandmother was lying there with her cap pulled down over her face and looking very strange.
"Oh, grandmother, what big ears you have!"
"All the better to hear you with."
"Oh, grandmother, what big eyes you have!"
"All the better to see you with."
"Oh, grandmother, what big hands you have!"
"All the better to grab you with!"
"Oh, grandmother, what a horribly big mouth you have!"
"All the better to eat you with!" And with that he jumped out of bed, jumped on top of poor Little Red Cap, and ate her up. As soon as the wolf had finished this tasty bite, he climbed back into bed, fell asleep, and began to snore very loudly.
A huntsman was just passing by. He thought it strange that the old woman was snoring so loudly, so he decided to take a look. He stepped inside, and in the bed there lay the wolf that he had been hunting for such a long time. "He has eaten the grandmother, but perhaps she still can be saved. I won't shoot him," thought the huntsman. So he took a pair of scissors and cut open his belly.
He had cut only a few strokes when he saw the red cap shining through. He cut a little more, and the girl jumped out and cried, "Oh, I was so frightened! It was so dark inside the wolf's body!"
And then the grandmother came out alive as well. Then Little Red Cap fetched some large heavy stones. They filled the wolf's body with them, and when he woke up and tried to run away, the stones were so heavy that he fell down dead.
The three of them were happy. The huntsman took the wolf's pelt. The grandmother ate the cake and drank the wine that Little Red Cap had brought. And Little Red Cap thought to herself, "As long as I live, I will never leave the path and run off into the woods by myself if mother tells me not to."
They also tell how Little Red Cap was taking some baked things to her grandmother another time, when another wolf spoke to her and wanted her to leave the path. But Little Red Cap took care and went straight to grandmother's. She told her that she had seen the wolf, and that he had wished her a good day, but had stared at her in a wicked manner. "If we hadn't been on a public road, he would have eaten me up," she said.
"Come," said the grandmother. "Let's lock the door, so he can't get in."
Soon afterward the wolf knocked on the door and called out, "Open up, grandmother. It's Little Red Cap, and I'm bringing you some baked things."
They remained silent, and did not open the door. The wicked one walked around the house several times, and finally jumped onto the roof. He wanted to wait until Little Red Cap went home that evening, then follow her and eat her up in the darkness. But the grandmother saw what he was up to. There was a large stone trough in front of the house.
"Fetch a bucket, Little Red Cap," she said. "Yesterday I cooked some sausage. Carry the water that I boiled them with to the trough." Little Red Cap carried water until the large, large trough was clear full. The smell of sausage arose into the wolf's nose. He sniffed and looked down, stretching his neck so long that he could no longer hold himself, and he began to slide. He slid off the roof, fell into the trough, and drowned. And Little Red Cap returned home happily and safely.
You MUST include the following in your design:
- Use a photo on the left of Red Riding Hood
- Create a title
- Create a drop cap
- Copy Grimm's tale for your body text
- Use RED instead of yellow for title and drop cap
- Use WHITE for body text
- Use a dark grey/charcoal background
RESOURCES:
Once upon a time there was a sweet little girl. Everyone who saw her liked her, but most of all her grandmother, who did not know what to give the child next. Once she gave her a little cap made of red velvet. Because it suited her so well, and she wanted to wear it all the time, she came to be known as Little Red Cap.
One day her mother said to her, "Come Little Red Cap. Here is a piece of cake and a bottle of wine. Take them to your grandmother. She is sick and weak, and they will do her well. Mind your manners and give her my greetings. Behave yourself on the way, and do not leave the path, or you might fall down and break the glass, and then there will be nothing for your sick grandmother."Little Red Cap promised to obey her mother. The grandmother lived out in the woods, a half hour from the village. When Little Red Cap entered the woods a wolf came up to her. She did not know what a wicked animal he was, and was not afraid of him.
"Good day to you, Little Red Cap."
"Thank you, wolf."
"Where are you going so early, Little Red Cap?"
"To grandmother's."
"And what are you carrying under your apron?"
"Grandmother is sick and weak, and I am taking her some cake and wine. We baked yesterday, and they should give her strength."
"Little Red Cap, just where does your grandmother live?"
"Her house is a good quarter hour from here in the woods, under the three large oak trees. There's a hedge of hazel bushes there. You must know the place," said Little Red Cap.
The wolf thought to himself, "Now there is a tasty bite for me. Just how are you going to catch her?" Then he said, "Listen, Little Red Cap, haven't you seen the beautiful flowers that are blossoming in the woods? Why don't you go and take a look? And I don't believe you can hear how beautifully the birds are singing. You are walking along as though you were on your way to school in the village. It is very beautiful in the woods."
Little Red Cap opened her eyes and saw the sunlight breaking through the trees and how the ground was covered with beautiful flowers. She thought, "If a take a bouquet to grandmother, she will be very pleased. Anyway, it is still early, and I'll be home on time." And she ran off into the woods looking for flowers. Each time she picked one she thought that she could see an even more beautiful one a little way off, and she ran after it, going further and further into the woods. But the wolf ran straight to the grandmother's house and knocked on the door.
"Who's there?"
"Little Red Cap. I'm bringing you some cake and wine. Open the door for me."
"Just press the latch," called out the grandmother. "I'm too weak to get up."
The wolf pressed the latch, and the door opened. He stepped inside, went straight to the grandmother's bed, and ate her up. Then he took her clothes, put them on, and put her cap on his head. He got into her bed and pulled the curtains shut.
Little Red Cap had run after flowers, and did not continue on her way to grandmother's until she had gathered all that she could carry. When she arrived, she found, to her surprise, that the door was open. She walked into the parlor, and everything looked so strange that she thought, "Oh, my God, why am I so afraid? I usually like it at grandmother's." Then she went to the bed and pulled back the curtains. Grandmother was lying there with her cap pulled down over her face and looking very strange.
"Oh, grandmother, what big ears you have!"
"All the better to hear you with."
"Oh, grandmother, what big eyes you have!"
"All the better to see you with."
"Oh, grandmother, what big hands you have!"
"All the better to grab you with!"
"Oh, grandmother, what a horribly big mouth you have!"
"All the better to eat you with!" And with that he jumped out of bed, jumped on top of poor Little Red Cap, and ate her up. As soon as the wolf had finished this tasty bite, he climbed back into bed, fell asleep, and began to snore very loudly.
A huntsman was just passing by. He thought it strange that the old woman was snoring so loudly, so he decided to take a look. He stepped inside, and in the bed there lay the wolf that he had been hunting for such a long time. "He has eaten the grandmother, but perhaps she still can be saved. I won't shoot him," thought the huntsman. So he took a pair of scissors and cut open his belly.
He had cut only a few strokes when he saw the red cap shining through. He cut a little more, and the girl jumped out and cried, "Oh, I was so frightened! It was so dark inside the wolf's body!"
And then the grandmother came out alive as well. Then Little Red Cap fetched some large heavy stones. They filled the wolf's body with them, and when he woke up and tried to run away, the stones were so heavy that he fell down dead.
The three of them were happy. The huntsman took the wolf's pelt. The grandmother ate the cake and drank the wine that Little Red Cap had brought. And Little Red Cap thought to herself, "As long as I live, I will never leave the path and run off into the woods by myself if mother tells me not to."
They also tell how Little Red Cap was taking some baked things to her grandmother another time, when another wolf spoke to her and wanted her to leave the path. But Little Red Cap took care and went straight to grandmother's. She told her that she had seen the wolf, and that he had wished her a good day, but had stared at her in a wicked manner. "If we hadn't been on a public road, he would have eaten me up," she said.
"Come," said the grandmother. "Let's lock the door, so he can't get in."
Soon afterward the wolf knocked on the door and called out, "Open up, grandmother. It's Little Red Cap, and I'm bringing you some baked things."
They remained silent, and did not open the door. The wicked one walked around the house several times, and finally jumped onto the roof. He wanted to wait until Little Red Cap went home that evening, then follow her and eat her up in the darkness. But the grandmother saw what he was up to. There was a large stone trough in front of the house.
"Fetch a bucket, Little Red Cap," she said. "Yesterday I cooked some sausage. Carry the water that I boiled them with to the trough." Little Red Cap carried water until the large, large trough was clear full. The smell of sausage arose into the wolf's nose. He sniffed and looked down, stretching his neck so long that he could no longer hold himself, and he began to slide. He slid off the roof, fell into the trough, and drowned. And Little Red Cap returned home happily and safely.
Wednesday, April 23, 2014
GDL 2 - Animated GIF Rocket

GRADING OBJECTIVES
- Smooth tweening
- Complete animation looping
- Proper file type
LINKS:

Tuesday, April 22, 2014
GDL 2 - Illustrator Animation
Create a couple basic flash animations in Adobe Illustrator by following the tutorial. Pay close attention and use your layers panel ( Window >> Layers ). Post your finished .swf file to blogger.
Grading Objectives:
Grading Objectives:
- Create 2 working animations
- Animations flow smoothly
- Artwork is done well
Links:
Monday, April 21, 2014
GIT 1 - Fairy Tale Page
Follow along with the tutorial to create the first page of a fairy tale book using Adobe Illustrator. Post to blogger when you are finished.
GRADING OBJECTIVES:
LINKS:
http://design.tutsplus.com/tutorials/create-the-first-page-of-a-fairy-tale-story-book-with-a-hint-of-kitsch--vector-1122
GRADING OBJECTIVES:
- Use of grid
- Use of Text Wrap
- Creating a Drop Cap
- Creation of all tutorial elements (castle, owl, tree)
- Use of texture
LINKS:
http://design.tutsplus.com/tutorials/create-the-first-page-of-a-fairy-tale-story-book-with-a-hint-of-kitsch--vector-1122
GDL 1 - 3D Pixel Art
For this assignment you will be following a tutorial to make 3D pixel letters on a decorative background. The only alteration you should make is to change "vectortuts" to the name of the pixel character you drew last week.
When your letters are complete, bring up your grid to draw your character. You may create your character using
When your letters are complete, bring up your grid to draw your character. You may create your character using
- Rectangles and the Pathfinder Palette or
- Snap to Grid and the Pen Tool
When your character is complete, apply the 3D effect to it just as you did to the letters.
GRADING OBJECTIVES:
- Completion of tutorial
- 3D text
- Cloud with gradients
- Sunburst background
- Completion of pixel art character (only use straight lines!)
- Applying 3D effect to pixel character
LINKS:
Monday, April 14, 2014
GIT 1 - Magazine Layout

Create a magazine layout with a full bleed. You may choose any topic. You have to use the color scheme provided. You may use any photo and filler text off the internet.
Grading Criteria
- Proper page layout (margins, gutter, bleed)
- Full color bleeds
- Use of provided color scheme
Color Scheme

Monday, March 31, 2014
GIT 1 - Tattoo Block Print
DUE: Wednesday April 2nd
Create a tattoo style design for block printing. Follow the tutorial.
LINKS:
http://blog.spoongraphics.co.uk/tutorials/how-to-create-a-classic-tattoo-style-vector-illustration
Create a tattoo style design for block printing. Follow the tutorial.
LINKS:
http://blog.spoongraphics.co.uk/tutorials/how-to-create-a-classic-tattoo-style-vector-illustration
GDL 2 - Origami Bird
DUE: April 2nd

Create an origami bird using the tutorial. Start with the image on the right.
Grading Objectives:
Create an origami bird using the tutorial. Start with the image on the right.
Grading Objectives:
- Create bird using the Rectangle and Pen tools
- Use multiple fill colors for depth
- Use gradients to increase depth
- Add shadow
LINKS:
GDL 1 - Cartoon Egg
DUE: April 2nd
Create the 4 cartoon egg characters in Illustrator according to the tutorial.
Grading Objectives:
Create the 4 cartoon egg characters in Illustrator according to the tutorial.
Grading Objectives:
- Use Blend tool for shading effects
- Create shapes using Ellipse and Direct Selection tools
- Create your own brush
LINKS:
Thursday, March 20, 2014
GDL 2 - Space Invaders
Download game files here.
Download game files. Double click the .zip file on your computer to unzip it. Open Google Drive and create a new file named "Games". Right click the Games folder and click Share >> Share... Select Public on the Web. Open the folder and copy the game files into it.
Create a ship or tank at 20px, an alien invader at 20px, a laser at 8px, and a bomb at 8px. Save for Web >> PNG-24. Replace the alien1a.png, alien1b.png, alien2a.png, alien2b.png with your alien files. The game contains 2 aliens, each with 2 images for a basic animation. Continue replacing all the game images until your game works.
Monday, March 17, 2014
GIT 1 - Block Printing
DUE: March 21, 2014
Create 10 block prints in groups of 2.
Start by selecting a quote, you may visit http://www.brainyquote.com/ to find one. I suggest using a short quote such as:
Adults are obsolete children. -Dr. SeussOnce you have selected a quote, use the font that you or your partner created to layout a black and white print of your quote with the size of 5" x 8". File >> Print your design to hp2600.
Take your paper print and draw over all of it using a pencil. Flip your paper, pencil covered design down, onto a linoleum block. Hold it in place so that it does not move. Have your partner rub the pencil onto the block. Remove the paper. Your design should now be transfered in reverse to the linoleum block.
Using the special carving knives, carve your design into the block. ALWAYS cut away from yourself and others. Make shallow cuts. These blocks are thick enough to allow for a design on each side. If you cut too deep, you will not be able to complete your next assignment, resulting in an "F". You will not be given an extra block if you mess up.
Grading Objectives:
- Create 10 prints with partner
- Using the right amount of ink for a clean, legible print
- Carving smooth and straight lines
- Carving to a proper 1/16" to 1/8" depth
STANDARD RUBRIC
Excellent
10
|
Average
7
|
Poor
5
|
Failure
0
| |
Design Quality
|
The shapes are perfectly aligned without any jagged edges or corners.
|
The shapes are well aligned with only a few jagged edges or corners.
|
The shapes are poorly aligned with many jagged edges or corners.
|
No attempt
|
Objective Elements
|
The design looks exactly how it should look. Contains all grading objectives.
|
The design resembles the demo, but lacks some objectives.
|
The design is a poor representation of the example.
|
Friday, March 7, 2014
GDL 2 - Retirement Postcard
DUE: Tuesday March 11th

Create 3 postcards to use on the retirement page of your future website. At least one must use the tutorial. You may use another design method for the other 2, but they must be of similar complexity.
LINKS:
http://design.tutsplus.com/tutorials/how-to-create-a-vintage-type-postcard--vector-5291
Create 3 postcards to use on the retirement page of your future website. At least one must use the tutorial. You may use another design method for the other 2, but they must be of similar complexity.
LINKS:
http://design.tutsplus.com/tutorials/how-to-create-a-vintage-type-postcard--vector-5291
Thursday, March 6, 2014
GDL 1 - Animal Alphabet Books
DUE: Friday March 14th
Create a cute cartoon animal head illustration in Adobe Illustrator. Add Gradients, create effects with Opacity, warp shapes with the Direct Selection Tool, and build design elements with the Pathfinder tools.
After completing the Panda from the tutorial, create another original animal design in the same style.
In your rows, create 26 animals, one for every letter of the alphabet. Each team member should create 4 or 5 animals. Combine the animal designs into a book using Adobe InDesign. Post your book as a PDF.
LINKS:
http://vectips.com/tutorials/create-a-cute-panda-bear-face-icon/
Monday, March 3, 2014
GIT 1 - Skull Sticker
Use the tutorial to design a skull and crossbones sticker. When the tutorial says...
At this point you now need to use your skills to convert your skull into a cut-ready design. Press [CMD] + Y to switch to outline mode and see what the cutter sees. Go through your design to expand lines and use the Pathfinder tools as necessary.
Using your own font from last week, add letters to make a bumper sticker.
LINKS:
http://blog.spoongraphics.co.uk/tutorials/create-a-skull-crossbones-sticker-design-in-illustrator
"Everything looks better with some distressed treatment. Copy a texture from my vector bumper pack into the design."STOP!
At this point you now need to use your skills to convert your skull into a cut-ready design. Press [CMD] + Y to switch to outline mode and see what the cutter sees. Go through your design to expand lines and use the Pathfinder tools as necessary.
Using your own font from last week, add letters to make a bumper sticker.
LINKS:
http://blog.spoongraphics.co.uk/tutorials/create-a-skull-crossbones-sticker-design-in-illustrator
GDL 1 - Four Leaf Clover
DUE: Wed. March 5
Create a 4 leaf clover for St. Patrick's Day. Follow the tutorial to create your design.
Upon completion, combine your clover and the ribbon from the previous tutorial to create a St. Patrick's Day poster.
Grading Objectives
Create a 4 leaf clover for St. Patrick's Day. Follow the tutorial to create your design.
Upon completion, combine your clover and the ribbon from the previous tutorial to create a St. Patrick's Day poster.
Grading Objectives
- Direct Selection Tool and Pathfinder tools to create the proper shape.
- Gradients for color
- Combining previous projects into your final design
LINKS:
Thursday, February 27, 2014
GDL 1 - Ribbon
Learn to use the Direct Selection Tool (white arrow) to modify shapes. Create a rectangle. Use the Direct Selection tool to click the top left anchor point. Hold [SHIFT] and click the top right anchor point. Hold the right arrow key down and the rectangle will slant to the side.
Follow the tutorial for the rest of the illustration.
LINKS:
http://blog.spoongraphics.co.uk/tutorials/create-a-cool-ribbon-style-logo-graphic-in-illustrator
Follow the tutorial for the rest of the illustration.
LINKS:
http://blog.spoongraphics.co.uk/tutorials/create-a-cool-ribbon-style-logo-graphic-in-illustrator
GDL 2 - Future Website 5 Year Logo

DUE: Friday Feb. 28th
Create an academis logo for the school you will attend after high school. It can be a college, university, trade school, or company training.
Use a shield design and add elements specific to your future. If you intend to work on cars, use a wrench and wheel. If you intend to attend medical school, use a stethoscope and red cross. Use your imagination.
LINKS:
http://webneel.com/webneel/blog/how-create-logo-university-or-college-step-step-tutorial
GDL 1 - Landscape

Create a simple landscape illustration following the tutorial. You will enhance your abilities with the Shape and Pathfinder tools during this assignment.
Learn to use the Blend tool to create unique color schemes. Add Ben-day or Half-tone dots using Illustrators built in fills.
LINKS:
http://blog.spoongraphics.co.uk/tutorials/how-to-create-a-simple-landscape-scene-in-illustrator
RESOURCES:


Monday, February 24, 2014
GDL 2 - Career Website
Create a website to show your life plan. Your site should include 7 pages:
LINKS:
http://www.indianacareerexplorer.com/
- 5 years - 2019
- 10 years - 2024
- 20 years - 2034
- 30 years - 2044
- 50 years - 2064
- Your Legacy - 2114
Using Indiana Career Explorer, take tests and research possible careers. Learn about yourself, your strengths and weakness, and what your future may have in store for you. Plot a course for your future. Create a website that shows your dream life.
For each page be sure to include where you live, what career you have or what education you are receiving, and how much money you earn or how much you are spending on your education.
Grading Objectives:
LINKS:
http://www.indianacareerexplorer.com/
GDL 1 - Antique Map

Create an antique map of Hanover. Use the emergency exit plan photo at the bottom of this page as your reference.

Copy the map image into Illustrator to use as your reference photo. Set the map image layer to LOCK. Create a new layer so you can trace over the image without worrying about it moving. Use the Pen Tool to trace all of the rooms. Use the compass to show north, just like in the bottom left of the reference photo. Create a repeating grid pattern over the top of your drawing. Add the texture file linked below and adjust the opacity to give your drawing an antique feel. Click the eye on the reference image layer to make it disappear.
Post to Blogger.
RESOURCES:


Thursday, February 20, 2014
GDL 1 - Triangle Pattern

Thursday, February 13, 2014
GIT 2 - Shirt Mockup
Create a shirt mockup template you can use again and again.
LINKS
https://www.threadless.com/forum/post/975750/tutorial__making_a_shirt_mockup_template_from_a_photo/
LINKS
https://www.threadless.com/forum/post/975750/tutorial__making_a_shirt_mockup_template_from_a_photo/
GDL 2 - Speedometer

Create a speedometer by following the tutorial.
Learn to repeat a pattern using the Transform Effect Pattern. Make sure you create the dash at the top and bottom of the circle. Notice the 7.5 degree setting results in 24 lines (180 / 7.5 = 24). Since you have a line at the top and bottom, 180 degrees X 2 creates your entire 360 degree rotation.
Grading Objectives
- Proper line placement / 7.5 degree rotation
- Creating depth and dimension with gradients
- Details, details, details
- speed numbers
- varying dash size
- red indicator needle
LINKS:
GIT 1 - Fonts
Create your own font.
Create a complete serif font set, Aa through Zz. Include upper and lower case for a total of 52 letters.
Grading Objectives:
Create a complete serif font set, Aa through Zz. Include upper and lower case for a total of 52 letters.
Grading Objectives:
- Smooth lines
- Proper use of serifs
- Reuse of shapes
- Guide alignment
- Completion of all letters
GDL 1 - Geometric Poster
Geometric Design
Learn to create a repeating pattern and apply texture.
Grading Objectives
LINKS:
http://blog.spoongraphics.co.uk/tutorials/how-to-create-an-abstract-geometric-poster-design
NEXT PROJECT:
http://design.tutsplus.com/tutorials/create-an-easy-valentines-day-bunny-in-adobe-illustrator--vector-23576
Learn to create a repeating pattern and apply texture.
Grading Objectives
- Proper object alignment
- Use of Offset Path
- Use of CMD + D for repeating actions
- Texture overlay
LINKS:
http://blog.spoongraphics.co.uk/tutorials/how-to-create-an-abstract-geometric-poster-design
NEXT PROJECT:
http://design.tutsplus.com/tutorials/create-an-easy-valentines-day-bunny-in-adobe-illustrator--vector-23576
Wednesday, February 12, 2014
Monday, February 10, 2014
GDL 1 - Compass
DUE: Wednesday, February 12th

Grading Objectives
- Even Lines
- Use of Custom Brush
- Perfect Circles
LINKS:
Wednesday, February 5, 2014
GIT 1 - Name Sticker
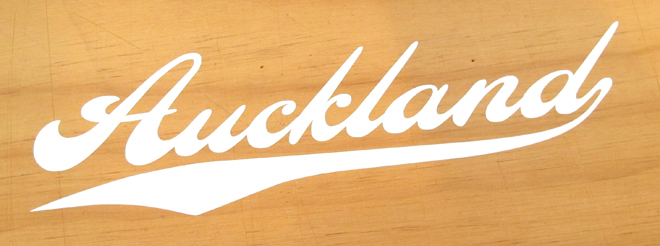
LINKS:
http://www.customstickers.co.nz/blog-posts/auckland-sticker-text-outline-illustrator-auckland-die-cut-sticker/
Tuesday, February 4, 2014
GDL 1 - Hero
Create a simple vector superhero in Adobe Illustrator. Use simple shape such as squares and circles to build your character.
 Follow the tutorial below. When you reach the point where you are instructed to move to Photoshop, you are done.
LINKS:
http://blog.spoongraphics.co.uk/tutorials/how-to-create-a-retro-style-superman-book-cover
LINKS:
http://blog.spoongraphics.co.uk/tutorials/how-to-create-a-retro-style-superman-book-cover
Monday, February 3, 2014
GDL 1 - Intro to Logos
Learn about different types of Logos:
http://learngdl.blogspot.com/2013/08/logo-types.html
Assignment:
Find an example of each (5) type of logo. Copy and paste them into Illustrator. Use the Type tool to properly label each logo type.
Visit Google and click on the image search. Search for "Logo", "Wordmark" or any other combination of words you think will get you the results you need. Find an image that fits your need, click it to make it larger, right-click (or CMD+click) and choose "Copy". Move to Illustrator and open a new Letter-sized document. Edit >> Paste your image onto the new document. Using your mouse and the white bounding boxes, resize your image to fit the page. Repeat 4 times until you have a Wordmark, Lettermark, Symbol, Combination Mark, and Emblem. Post to Blogger.
Grading Criteria:
- Correct identification of all 5 logo styles
- Fitting all logos onto one artboard
- Neatness
Sunday, February 2, 2014
GDL 2 - Week of Feb 3
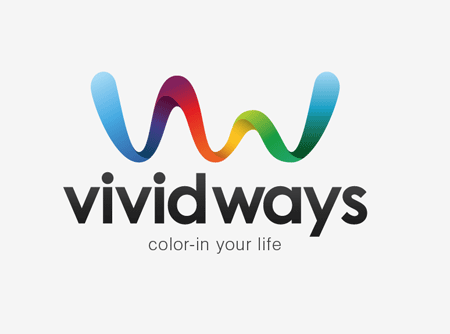
DUE: Wednesday 2/5
Follow the tutorial instructions to create a combo mark. Post your work to Blogger.
http://blog.spoongraphics.co.uk/tutorials/logo-design-process-and-walkthrough-for-vivid-ways
Grading Objectives:
- Clean lines, no jagged edges
- Proper use of the Gradient Palette
- Font modification
- Ability to follow directions
LOGO - Contest
DUE: Friday 1/31
Create 2 versions of a single logo design for a Freelancer.com logo contest. Use techniques from the tutorial above or last week's shield design.
Grading Objectives:
- Clean lines, no jagged edges
- Color scheme - does it fit the company?
- Style - does it fit the company?
- Use of tutorial techniques
- Originality
Sunday, January 26, 2014
GDL 2 - Week of 1/27
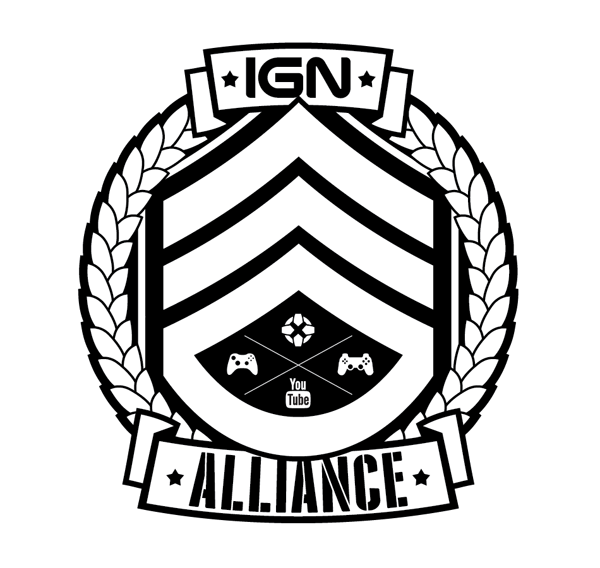 LOGO - Gaming Emblem
DUE: Wednesday 1/29
Follow the tutorial instructions to create an emblem. Pay attention to his use of the Pathfinder palette to create complex shapes and how he expands his strokes so he can make his final tweaks. Post your work to Blogger.
http://blog.spoongraphics.co.uk/tutorials/how-to-create-a-military-style-emblem-logo-design
Grading Objectives:
- Clean lines, no jagged edges
- Proper use of the Arc effect
- Font modification
- Ability to follow directions
LOGO - Contest
DUE: Friday 1/31
Create 2 versions of a single logo design for a Freelancer.com logo contest. Use techniques from the tutorial above.
Grading Objectives:
- Clean lines, no jagged edges
- Color scheme - does it fit the company?
- Style - does it fit the company?
- Use of tutorial techniques
- Originality
Thursday, January 23, 2014
GDL 2 - Logo Contest
https://www.freelancer.com/contest/Design-a-Logo-for-a-New-Gaming-Company-55845.html
Complete 2 entries for the above logo contest and post them to your site.
Complete 2 entries for the above logo contest and post them to your site.
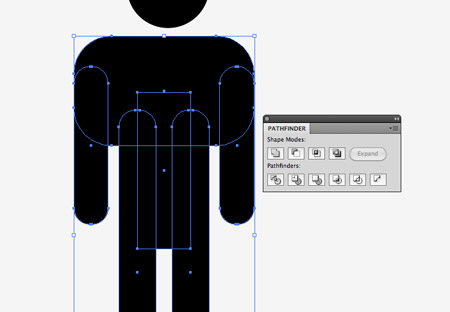
GIT 1 - Monkey Vinyl
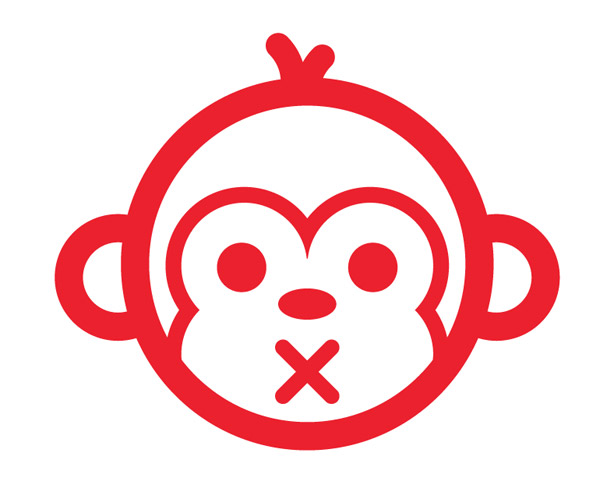
Follow the link to create vector artwork for the sign vinyl. Expand upon the tutorial by creating a complete sign with an original character. Name your file SIGN1yourname.ai. Upload your completed .ai file to the link at the top of this page. Create a JPEG and post it on your blog.
LINKS:
http://blog.spoongraphics.co.uk/tutorials/how-to-create-a-monkey-face-with-vector-line-work
Monday, January 20, 2014
Welcome to 2nd Semester!
ALL Graphic Arts Students -
Visit this page by opening Chrome browser and visiting learnGDL.blogspot.com.
If you do not currently have a Google account (yourname@gmail.com) you need to create one. Create a Blogger website to display your assignments. This is how your work will be graded. Email your Blogger site address to me. If I do not receive your site address via email or you fail to post JPEG images of your assignments, you will receive ZEROs on your assignments.
Familiarize yourself with Google Drive. This is a free service that will allow you to back up your files. I highly recommend that you backup your work at the end of your class period. You are responsible for your work. Many other students use the computers in this classroom everyday. Computers fail, files are accidentally deleted and misfiled, and sometimes people are mean. You can avoid all of those issues by backing up your files.
LINKS:
Tuesday, January 14, 2014
GDL - Final Project
DUE: Thursday 1/16

Create a Despicable Me Minion. You must include shading or texture and several of the following tools:

Create a Despicable Me Minion. You must include shading or texture and several of the following tools:
- Rounded rectangle
- Ellipse
- Gradient
- Warp effect
- Pathfinder
- Pattern brush
- Blend
- Text
Thursday, January 9, 2014
GDL - Business Card Redo
DUE: Friday January 10, 2014

Create a business card. This was one of our first projects of the semester, and you are to do it again to see how much your skills have improved. Your design may be an improvement on the first one, or a completely new design.
Make sure to use bleed and inset guides as shown in the screenshot.
What dpi setting should you use?
What color space should you use?
What is the bleed for?
What information should be on the card?
What type of font should you use?
SIZE: 3.5" x 2"

Sunday, January 5, 2014


Subscribe to:
Posts (Atom)