Thursday, December 19, 2013

GDL - Vintage Poster


DUE: Friday, December 19th

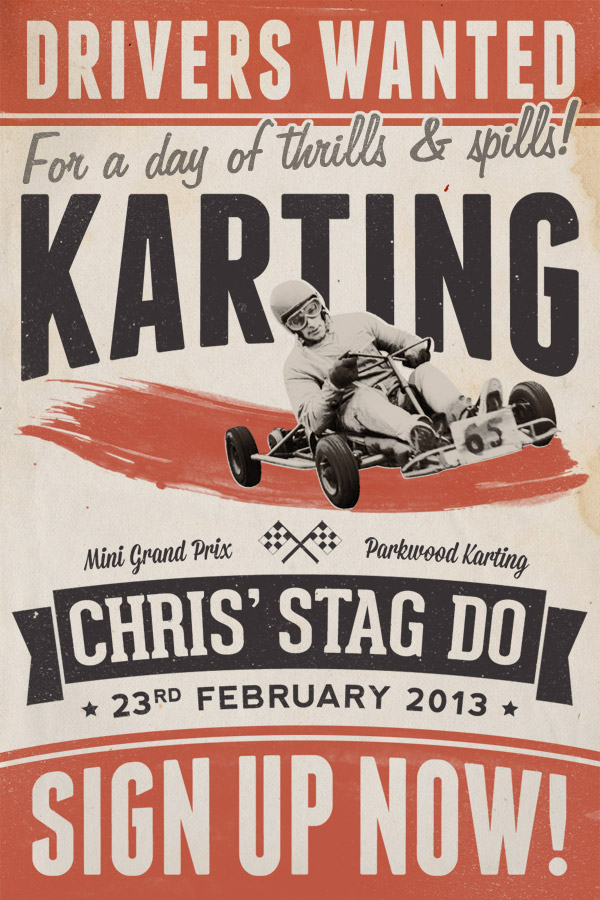
Create a vintage poster with your favorite hobby.  The tutorial using a go kart, but you may choose any subject and pull an image from google.  You may choose any paper texture, but there is one at the bottom of this page to make your life easier.  Follow the Chris Spooner tutorial here.

This tutorial will be a demonstration of the combined power of Photoshop and Illustrator.

File >> Save for Web...  and upload your finished project to your blogger for grading.

GRADE ELEMENTS:


  • Page layout built with Shapes and Pathfinder
  • Text layout
  • Proper page proportions (ie Portrait)
  • Adding texture with Opacity Blend Modes
  • Photo cutting and editing


GRADING:
Students will be graded on the quality of lines and the ability to utilize the tutorial tools.
RUBRIC


Excellent
10
Average
7
Poor
5
Failure
0
Design Quality
The shapes are perfectly aligned without any jagged edges or corners.
The shapes are well aligned with only a few jagged edges or corners.
The shapes are poorly aligned with    many jagged edges or corners.
No attempt at aligning shapes
Objective Elements
The design looks exactly how it should look. Contains all tutorial elements.
The design resembles the demo, but lacks some elements.
The design is a poor representation of the example.
The design looks nothing like the    example.


LINKS:
Tutorial : http://blog.spoongraphics.co.uk/tutorials/how-to-create-a-retro-style-race-poster-in-photoshop
Textures: http://lostandtaken.com/gallery/tag/paper


Monday, December 16, 2013

GDL - Multiple Color Image

DUE: Monday December 16th

Create 3 versions of the same image all on one Photoshop document.  Add a white and then black border to simulate a frame.  Upload to blogger.


  1. Open an image in Photoshop
  2. Select all and copy
  3. Image >> Canvas Size... double height
  4. Paste and position copy
  5. Image >> Canvas Size... increase height by original height
  6. Paste and position copy
  7. Using Layers, adjust Hue/Saturation so each image is different
  8. Add a small amount to height and width of canvas
  9. Add a new layer and make it white with the Paint Bucket
  10. Add a small amount to height and width of canvas
  11. Add a new layer and make it black with the Paint Bucket
  12. Save for Web & Devices

Thursday, December 12, 2013

GDL - Comic Book Covers

DUE: Friday, December 12th

Create a minimalist comic book cover with you favorite hero.  Google Minimalist Hero for project inspiration.  Follow the Chris Spooner tutorial here.

This tutorial will be a review of the Illustrator Pathfinder palette and Shape tools, as well as a great demonstration of their combined power.  Then, you will move your design to Photoshop to learn a basic coloring technique using Fill and the Area Selector tool.  In Photoshop you will also learn to apply a texture over your artwork to create an aged effect.

File >> Save for Web...  and upload your finished project to your blogger for grading.

GRADE ELEMENTS:

  • Character built with Shapes and Pathfinder
  • Character design inline with tutorial
  • Proper page proportions (ie Portrait)
  • Adding texture with Opacity Blend Modes


GRADING:
Students will be graded on the quality of lines and the ability to utilize the tutorial tools.
RUBRIC


Excellent
10
Average
7
Poor
5
Failure
0
Design Quality
The shapes are perfectly aligned without any jagged edges or corners.
The shapes are well aligned with only a few jagged edges or corners.
The shapes are poorly aligned with many jagged edges or corners.
No attempt at aligning shapes
Objective Elements
The design looks exactly how it should look. Contains all tutorial elements.
The design resembles the demo, but lacks some elements.
The design is a poor representation of the example.
The design looks nothing like the example.


LINKS:
Tutorial : http://blog.spoongraphics.co.uk/tutorials/how-to-create-a-retro-style-superman-book-cover
Textures: http://lostandtaken.com/gallery/tag/paper

Inspiration:  https://www.google.com/search?q=minimalist+hero&safe=off&rlz=1C1ASUT_enUS471US471&espv=210&es_sm=122&tbm=isch&tbo=u&source=univ&sa=X&ei=DtWpUsfdD-6uyAGxoYHgDw&ved=0CC4QsAQ


Tuesday, December 10, 2013

GDL - Intro to Photoshop

DUE: Wed. December 11

OBJECTIVE: Create several versions of a single image using Photoshop Layers, Blurs, Lasso Tools, and coloring capabilites.

Copy the image you wish to use.  Open PhotoShop and create a new document File >> New.  The preset should be set to Clipboard, which will set the size and color space to that of the image you previously copied.  Edit >> Paste or [CMD]+V to paste your image onto the Canvas.

On the Layers palette, right click the background and click duplicate.  Duplicate it again so you have 3 layers.  The first layer is your safety net in case you mess something up.  The top and middle layers are the ones you are going to colorize.

Use the Polygonal Lasso tool to outline the subject of your image (main person, car, etc).  Edit >> Copy or [CMD]+C to copy the subject and paste it with Edit >> Paste or [CMD]+V.  Photoshop will create a new layer for the pasted subject.

On the layers palette, select the top background layer.  Image >> Adjustments >> Hue/Saturation or [CMD]+U will bring up the Hue/Saturation dialog.  Make sure the Preview checkbox is selected so you can see what effects your changes will make.  Dragging the Saturation slider all the way to the left will create a B&W background.  Checking the Colorize box will set the entire background to shades of one color selected using the Hue slider.


BEFORE
AFTER

Friday, December 6, 2013

GDL - Photoshop

DUE: Tuesday, December 10

OBJECTIVE: Learn to incorporate Illustrator designs into real life pictures using Photoshop.

This technique can be used to show clients what their proposed designs look like in real life, for example on a business card or shirt.

INSTRUCTIONS:

  • Open Photoshop
  • Copy the picture at right
  • Create a new Photoshop document
  • CMD+V to paste the picture into Photoshop
  • Select an Illustrator design
  • Copy and paste it into a new layer in PS
  • Choose the area selection tool
  • Right click to use Free Transform/Distort/Skew to fit the design on the wall
  • Adjust the layer opacity settings to blend it into the brick

Wednesday, December 4, 2013

GDL - Holiday Ornament

DUE: Thursday, December 5th

OBJECTIVE:  Use Illustrator to create a holiday ornament with background as in the tutorial.  This project will reinforce and grow your Gradient and Pathfinder tool abilities.

LINKS:
http://vector.tutsplus.com/tutorials/illustration/how-to-create-an-enchanted-holiday-ornament-design/

Tuesday, December 3, 2013

GDL - Ice Design


DUE: Tuesday, December 3rd

OBJECTIVE:  Review + enhance Pathfinder and Gradient skills by creating an Ice design.

80%:  Follow the tutorial exactly

100%: Follow the tutorial, but use the resolution of your phone and set your design as a background.

    OR

100%: Use the tutorial to create a stained-glass style picture (ex. mountain, tree, santa).

LINKS:
http://blog.spoongraphics.co.uk/tutorials/how-to-create-an-icy-blue-vector-geometric-design


Sunday, December 1, 2013

GDL - iOS7 Style Flower Icon

DUE: Monday, December 2nd

Create the icon at right using the tutorial in LINKS.  This is an easy review project that utilizes skills you already have.

LINKS:
http://vector.tutsplus.com/tutorials/quick-tip-create-an-ios-7-inspired-flower-icon-using-the-rotate-tool/

Tuesday, November 12, 2013

CTE Career Fair - All Classes

All students will be required to participate in the CTE Career Fair.
  • Handouts must be ready for print by Wednesday, Nov. 20th
  • Posterboards are homework if not completed by Friday, Nov. 22nd
  • Career Fair is Tuesday, Nov. 26th
    • Display and all work must be ready by 8am
    • Dress professionally
The same rubric will be used for both the report and the presentation.
Your presentation will be graded on the following elements:
  • Visual Aids - Posters, brochures, cards
  • Presentation - Your ability to communicate verbally
  • Professionalism - How you act and dress
  • Knowledge of Career - How well researched your project is
  • Interactivity - Bringing visitors into the experience
If you are assigned a presentation in another class, you will be required to write a report for your Graphic Arts class instead of a presentation.  If you have 3 or more CTE classes, you are required to write a different report than the one you turn in for your other classes.

No matter what class you are doing a presentation for, you are expected to complete a handout in your Graphic Arts class.  Use the tools you have learned to create text effects and icons to complete your visually pleasing and informative handout.  For example, you might create a pencil icon to use as bullets.

Handout Specs:

  • Letter - 8.5" x 11"
  • Cut in half
    • 1/2 about the career
    • 1/2 how to get there
  • Black and White design


Handouts and Posterboards need to include:

  • Description of the career
  • Career outlook (growing field?)
  • Salary
  • Hanover CTE classes that apply
  • Top colleges/schools with websites
  • Trade associations with websites
  • Other web links for further info

Paint, spray paint, glue, vinyl lettering and colored construction paper is available to use on your posterboard.

LINKS:
Text Effect Tutorials: http://vector.tutsplus.com/category/tutorials/text-effects/
Icon Design Tutorials: http://vector.tutsplus.com/category/tutorials/icon-design/

Friday, November 8, 2013

GDL - 3D Text

DUE: Tuesday 11/12/13

Create a holiday poster using the tutorial provided in LINKS.  Use your imagination to create a completely unique holiday card or poster.  Pick a font to fit your theme.  Choose a color scheme that is indicative of your theme.  Some examples are:

  • Christmas = Red, Green, White
  • Kwanzaa = Red, Green, Black, Yellow
  • Hanukkah = Blue, White, Gold
  • Thanksgiving = Brown, Yellow, Orange, Dark Red
LINKS: 

Color Schemes:

Wednesday, November 6, 2013

GDL - Snowman Card

DUE: 11/7
Create a snowman.  Like the last assignment, this is mostly practice and review of the skills & tools you already know.

Take the snowman a step further and use the completed snowman to create a seasonal card, i.e. "HAPPY HOLIDAYS!" with extra snowflakes or a wreath.

GRADING OBJECTIVES: Gradients, shadows and light, line and shape precision, Pathfinder tools, Blend, and Warp

LINKS: http://vector.tutsplus.com/tutorials/illustration/create-a-snowman-illustrator/?search_index=1

Tuesday, November 5, 2013

GIT - Multi Color Block Print


ART DUE: 11/6
PRINTS DUE: 11/8

ARTBOARD SIZE : Letter 8.5" x 11"

Create this turtle - http://blog.spoongraphics.co.uk/tutorials/how-to-create-a-vector-sponge-art-effect-in-illustrator

Use Select >> Same >> Fill Color and [CMD] + G to group together each set of colors.  Separate your color groups and lay them out across your artboard.  Print.  Heat press to linoleum.  Carve.  Create multicolored prints.

Everyone has to design a turtle (other animals allowed in same style).  Block carving has to be done in groups so that each student carves 1 block.

Monday, November 4, 2013

GDL - Wreath


DUE: 11/5/13

Create a seasonal poster for a fictional holiday party.  Use the tutorial to create a wreath and then add your own who/what/when/where/why to create a complete invitation.

This is a review of the tools you have already learned.  You are incouraged to add in techniques from past projects, such as a distressed paper/grunge effect.

GRADING:  Line precision, uniformity, symettry, color scheme, sizing

SIZE: 8.5" x 11"

LINKS:
http://vector.tutsplus.com/tutorials/designing/quick-tip-how-to-create-a-traditional-wreath-in-adobe-illustrator/

Self Directed Free Project

You now have a strong base of design skills, but there is a lot more to learn.  You now have the option to direct your own learning.  I will continue to provide projects to those that choose not to learn on their own.

If you would like to choose your own projects, there are a few rules:

  1. Your project must be related to Graphic Design.
  2. You must create an outline or mindmap of your proposed project and have it approved by me.
  3. You must keep a daily journal of your progress and what you have learned (minimum 2 paragraphs each day).
  4. You must work and progress every day.
  5. You must present your project to the class and show what you have learned.
If you fail to follow the rules, you will have to have to return to normal class assignments.

Project Ideas:
  • Website design
  • Photography
  • Movies
  • Animation
  • E-commerce store
  • Create a fake persona/band/company and related website, apparel, etc.
LINKS:


Mind Mapping :

Tutorial Websites:
Illustrator - VectorTuts.com  
Photoshop - PSDTuts.com
Web Design - net.tutsplus.com

Friday, October 25, 2013

GDL - Monster Poster


DUE: 10/28

NEW TOOL: Live Trace

Take a photo of yourself
1. Click magnifying glass at top right of screen
2. Search and select “Photo Booth”
3. Take a scary picture


Turn photo into a scary B&W

1. Drag photo from Photo Booth to Illustrator
2. Live Trace
3. Select photo in Illustrator
4. click Live Trace on top bar
5. Adjust settings for desired look (preview)
6. click Expand on top bar
7. Adjust color and anchor points to enhance terror

Finish poster
1. Add scary eyeballs from last project
2. Create “Wanted” heading
3. Add grunge effect from landscape project


Save your work to Drive and post a JPEG to Blogger.

RESOURCES:


Thursday, October 10, 2013

GIT - Block Printing

DUE: Oct 21, 2013

Create a design using the tattoo tutorial.  After completing the tutorial, you may create another more complex design for the final print for extra credit.

Print out the final design and tranfer it to the linoleum block.  Carve out the design and create prints until you are satisfied with the result.

LINKS:
http://blog.spoongraphics.co.uk/tutorials/how-to-create-a-classic-tattoo-style-vector-illustration

Wednesday, October 9, 2013

GDL - Panda Head

DUE: Oct 22, 2013

Create a cute cartoon panda head illustration in Adobe Illustrator.  Add Gradients, create effects with Opacity, warp shapes with the Direct Selection Tool, and build design elements with the Pathfinder tools.

After completing the Panda from the tutorial, create another original animal design in the same style.

In your teams, create 26 animals, one for every letter of the alphabet.  Each team member should create 6 or 7 animals.  Combine the animal designs into a book using Adobe InDesign.  Post your book as a PDF.

LINKS:
http://vectips.com/tutorials/create-a-cute-panda-bear-face-icon/

Thursday, September 26, 2013

GDL - Greaser T-Shirt


DUE:  9/28

Create a shirt design in Illustrator.  Learn to add distressed effects with Pathfinder and how to display a design on a finished product.

LINKS:
http://blog.spoongraphics.co.uk/tutorials/how-to-create-a-vintage-style-greaser-t-shirt-design

Wednesday, September 25, 2013

GDL - Quiz Friday 9/27

Questions can include topics covered on previous tests and tools used in recent projects.

Blend tool - morphs from one object to another.  Can be used to blend colors and create color schemes.  Use Specified Steps to create a stepped blend for a color scheme.

Direct Selection Tool - Allow selection of individual anchor points rather than the whole object.  White Arrow in the toolbar.

Opacity - Opposite of transparency.  100% opacity means you cannot see through.  0% opacity is completely invisible.  Great for adding textures to designs.

Smart Guides - Helps the designer to make straight lines lineup anchor points.

CMD + D - Repeats, or duplicates, the last transform action made.

Also, know how to create a pattern brush, rotate objects, what key to hold to duplicate an object, and any other skills we learned during our projects.

Tuesday, September 24, 2013

GDL - Ribbon

DUE: 9/25

Create a ribbon graphic while learning to shear a rectangle with the Direct Selection Tool.  Create a color palette using the Blend Tool.

LINKS:
http://blog.spoongraphics.co.uk/tutorials/create-a-cool-ribbon-style-logo-graphic-in-illustrator

Monday, September 23, 2013

GDL - Colored Landscape


DUE 9/24

Created a colored landscape scene with simple vector shapes.  Learn to use the BLEND to to create color schemes.  Add a texture effect with the raster image below.


LINKS:
http://blog.spoongraphics.co.uk/tutorials/how-to-create-a-simple-landscape-scene-in-illustrator

RESOURCES:

Friday, September 20, 2013

GDL Antique Map

DUE: 9/23

Create an antique style map of Hanover using the skills you have learned including the line and shape tools, pathfinder palette, and custom pattern brushes.  Learn to use the layers palette.

Use the Emergency Exit Plan as your guide when creating your Hanover HS floor plan map.
Incorporate your last project, the compass, into your map.  Create repeating pattern borders as in the old map to the right.  Choose a color scheme that accentuates the antique feel of the map.

Upload your finished project to Blogger.


FILES:


Wednesday, September 18, 2013

GDL: Geometric Pattern

DUE DATE: 9/19

Using many of the tools and techniques we have already learned, create the repeating geometric pattern in the tutorial.  

When you reach the line, "For this we move over to Photoshop." you are done.  Upload your finished pattern to Blogger and set it as your computer's desktop background.

LINKS:
http://blog.spoongraphics.co.uk/tutorials/how-to-create-an-abstract-geometric-poster-design

Tuesday, September 17, 2013

GIT : Hand Lettering

Objective:  Create a two complete font sets, one each serif and sans serif.  Include both upper and lower case letters for each type.

WHAT TO TURN IN:
Paper sketch - Lines must be measured and precise.  At least 7 letters of each font type :  ART + dupy
Upload JPEG images of the completed digital fonts to Blogger

Sunday, September 8, 2013

9/12 GIT-Only! Sign Assignment

Follow the link to create vector artwork for the sign vinyl.  Expand upon the tutorial by creating a complete sign with an original character.  Name your file SIGN1yourname.ai.  Upload your completed .ai file to the link at the top of this page.  Create a JPEG and post it on your blog.

LINKS:
http://blog.spoongraphics.co.uk/tutorials/how-to-create-a-monkey-face-with-vector-line-work

9/12 Biz Pack Assignment

Business Pack Assignment
Due: Thursday 9/12/13

Create a digital and paper business pack for a club, team, or local business located in Hanover Township.  Do NOT use a chain such as Stracks, Chase, or McDonalds.  Turn in at least 3 rough draft logo ideas and 1 final paper sketch logo and business card drawn to scale.  Also, upload JPEG versions of the business pack to your blog.

Business Pack:
New & Original Logo
2 Sided Business Card - 3.5"W x 2"H
Letterhead - 8.5"W x 11"H
Envelope #10 - 9.5"W x 4.125"H

Grading Criteria:
Color Scheme
Proper Sizing/Measuring
Originality
Use of Learnt Tools
Quality

Links:

Grading 

Saturday, August 17, 2013

Logo Types

Of the billions of logo designs in the world, they all fit into 5 categories: Symbol, Wordmark, Lettermark, Combination Mark and Emblem.  If the logo doesn't match one of these, its probably not a logo.  Keep in mind that many companies actually keep a unified group of logos from different categories and choose the one that best fits each situation.

SYMBOL

Symbols are designs without letters.  Usually the symbols are simple designs.  The Nike "Swoosh" and Apple's "Apple" are prime examples. However, both companies had to build their brands by using their Symbols as part of Combination Marks (defined later).  These brands are now so well known that they can just use their symbol.

Symbols were likely the first logos.  Up until the last century, most people were illiterate.  Writing a business name on a sign was useless.  Instead, you would name it "Falcon Restaurant" and put a painting of a Falcon out front.

WORDMARK

Wordmarks are stylized words.  Disney is one example, your own signature is another.  I suggest that you stop dotting your I's with hearts when you get a real job.  Wordmarks work well with unique names, as long as they aren't too long.

LETTERMARK

Lettermarks are just like Wordmarks, except they only contain initials.  Logos need to be quickly identified so if your company has a long name it is going to make a bad Wordmark.  That is why Hewlett Packard was shortened to HP for their logo.

Like Symbols, Lettermarks seem to be most effective when used in conjunction with a matching Combination Mark (see next).

COMBINATION MARKS

When you place a Symbol near either a Wordmark or Lettermark, you get a Combination Mark.  Most companies with Symbol logos also have a Combination version.  You can see how the Comedy Central logo would also be effective without the words at the bottom, which would leave you with a Lettermark.  When your design has the space, use the larger combination mark so that the audience understands the meaning of the Lettermark when it is used by itself.

EMBLEM

Emblems are drawings with words incorporated into one unit.  The NFL shield is an example.  The line between Emblems and the other logo types can be a bit fuzzy since all of the other logo types become an Emblem by adding more artwork to them.


ASSIGNMENT

Find an example of each type of logo at sites like http://logofaves.com/ or Google Images.  Right click the image and save it to your computer.  Login to your own blog site and upload all 5 logos into a single post.  Be sure to label each type correctly.

Tips for Taking the Right Photos

These tips are for amateurs.  The pros don't follow some of these, and eventually you may not need to either.  If your just starting, these few tips will help you get by until your skills improve.

Take too many pictures.  We're all bound to get lucky once in a while and stick gold with a picture.  You increase your odds by taking more photos.  Its easy to delete the junk, but you can never get back the shot you missed.

Take big pictures.  Zoom out a little and get more in the frame than you need.  You wouldn't hang a picture right against the ceiling, and the subjects of your picture need a little space too.  Go big, its simple to crop the picture down later.  Plus, this gives you the ability to correct the picture if your camera is off level.

Find simple backgrounds.  You want people to see the object you intend them to, not a "Where's Waldo" drawing.  Move left, right, up and down until you can get a simple background.  Sometime you have to lay on the ground to get a blue sky background.

Pay attention to light sources.  If the sun or a light is behind your subject, your subject will appear dark. Move around so the light is at your back if you can.3
3.e shutter button doesn't cause blur.

The best camera is the one you have with you.  Don't fret too much about having a DSLR with you at all times.  Most phones have the capability of capturing the essence of any shot.  Maybe the shot won't end up hanging in an art gallery, but at least you got it.  If the shot is going to end up small on a website, the quality probably doesn't matter much anyways.  Of course, a true professional can take a better shot with an iPhone than either of us can with a $5k DSLR.


Extra Links to Improve Your Skills:
http://lifehacker.com/5815742/basics-of-photography-the-complete-guide


Friday, August 16, 2013

Gestalt Theory

Gestalt Theory (Wikipedia) is more of a description of human vision than a true set of rules.  The Theory says that humans perceive the whole before the parts.  

Emergence - Objects close together become one.  

We don't see legs, a tail, a head and fur, rather we see a dog.  It is only later that we see these individual parts if we chose to study the object.
The last time you went to the store, what kind of shoes was the clerk wearing?  You probably don't know, but you know she was wearing shoes.  Your brain handles so much information in a day that it simplifies.  You only would have noticed the unusual (no shoes).

Reification - Visual construction of non-existant objects

Your mind tends to fill in the blanks.  You can imagine the clerk wearing shoes even if you couldn't see them.

This is a popular trend in design right now.  Schilling Bros. Lumber is a great example.  By taking a letter and hanging it off the edge of the design, your mind creates the rest of the "S".

Multi Stability - One image has multiple interpretations

M.C. Escher made a career out of Multi Stability.  The mind will shift between the 2 or more versions of what it sees.  This is not often used in commercial design, but can be used subliminally.

Other famous versions of Multi Stability are the 2 face/vase and the old/young woman.

Invariance - Ability to recognize objects even when they vary

Even if you only saw a red car from the front, your mind can recognize it as the same car when you see it from the side or if it is now white.  Your mind can recognize most familiar objects no matter how they are rotated, skewed, colored, deformed, or even redrawn in a new style.